Cross Stitching in 2023

I sew my clothes by machine, but I’ve also liked to have a hand project to work on for the past 20 years. My number one preference was knitting, but sadly I’ve had to stop because of increasing carpal tunnel symptoms, especially in my non-dominant hand. Knitting is a 2-handed art. I also know how to crochet, but I’m less sure what I would want to make.

Lately, my hand craft has been counted cross stitch. In the past, I’ve had an on-again, off-again relationship with cross stitch. When I tire of cross stitch, I like to work free hand on crewel embroidery with wool.

I have better magnification glasses now which makes cross stitch more pleasurable.

I usually cross stitch small ornaments. I’ve always wanted to stitch at least one larger piece suitable for framing. In early 2024, I realized it wasn’t going to happen with “Autumn Twilight.” I was very happy when I packed it up and put this in the do-not-finish pile. The progress over two years was small because I hated working on it! Next.

My cross stitching in 2023 was all Halloween and Christmas related.

Late last year, I discovered a wealth of cross stitch designs on the Pinker n Punkin Quilting blog. These creative designs by the blog author cover all of the seasons and are generously offered for free.

When I saw the Boo and Jack Stamp, I thought it would be perfect for the black 14 count aida I had in stash. This adorable trick-or-treater is not afraid of the dark.

It’s tiny, under 3 inches. I wavered between finishing this piece flat or as a pillow. I finished it flat, with felt, ribbon, and buttons. I’d had the jack o’ lantern button for a long time, so I was thrilled to find the perfect use for it. I’m happy with the way the piece turned out, although I got it slightly crooked. My finishing skills are far from perfect, but my Boo is perfect!

Earlier in the year, I bought a 4-pack of designs by Tiny Modernist called Halloween Cuties.

They’re about 5 inches, but are a bit larger if they’re finished with a border of fabric as shown in the photo.

I chose to stitch Halloween House on 28 count antique white linen evenweave that I had in stash. With evenweave, I was stitching over two threads which results in a finished size the same as 14 count aida.

The design has a stitched teal background. As you can see, it looks bland without a background on the off-white fabric. It would work with a gray or purple hand dyed or similar fabric if you didn’t want to stitch a background color. I liked the teal background color when I bought the designs, but I didn’t like it when I started stitching it. Instead I used a variegated purple floss I had in stash, and stitched a half stitch.

I laced it to a thick 4 x 6 canvas, glued brown paper to the back, and added a sparkly orange ribbon around the sides.

I stitched this Christmas goose for the second time, this time on blue Aida, and finished it as a pillow ornament. I believe I found the goose design on Pinterest.

I stitched a second design on from Pinker n Punkin Quilting, called Skiing on the Farm. I also stitched it on blue aida.

I finished it flat with a bigger flat background and checked fabric and gingham ribbon for a charming homespun look.

I have loved the Grinch ever since I saw the original TV show which first aired during my childhood. Both the Grinch and his faithful dog, Max, are free designs from Brooke’s Book Publishing. I stitched the mean Grinch on plastic canvas. The nice big-hearted Grinch is supposed to be on the other side, but I haven’t stitched it yet. If I do, I might elect to keep them separate. I later added the ornament he is holding.

I am currently cross stitching an autumn still life scene from a kit by Riolis. It uses wool blend thread which I like working with, but have never used for cross stitch before. I also have an idea for that larger, framed piece I aspire to. I used free software to convert a painting to a cross stitch pattern. The planning is fun.

Tiered Skirt to Top Refashion

This is the first garment sewing I’ve done this year and it’s a refashion.

I bought the tiered full skirt at the thrift store several years ago. The fabric is a nice rayon that feels sueded, the pattern is paisley, and the color is called “very berry”.

I needed more non-pastel tops, and I thought this shade of red goes well with my coloring. I was excited about this skirt’s possibilities to transform into a top I would love. I would have to use my skills to perform the magic.

I wanted a top similar to the free Imby’s Flowy Top. My vision was a top that made use of the skirt’s pretty tie with beaded ends, a front slit at the neck, and generous sleeves past the elbows.

I cut a basic front and back from the middle of the skirt using my boxy top pattern as a guide. I cut rectangles for sleeves from the sides of the skirt. I sewed the sleeves in flat centering them on the shoulder seam, and then sewed the side seams. I made a slit for the front and used red bias tape for finishing. I was able to remove the entire long tie from the skirt by carefully cutting into part of the waistband. It wouldn’t pull out because of the beads at the ends. I sewed bias tape to the neckline and then sewed it to the inside of the top enclosing the tie as I sewed.

I wanted the sleeves to be loose and not elasticized. I later reduced the length and volume to my liking. I had to piece one of the sleeves to get the needed width at the shoulder. I finished all seams by serging.

I like the fit. I realized I couldn’t have a voluminous body, because the wide sleeves used a great deal of fabric. This was not intended as a summer top so the sleeves were a must! There is usually some improvising and compromising to make when sewing a refashion to make use of the limited fabric of the original garment.

I can wear the top with the neck tied or untied.

This boho-style top is one of my favorite refashions, and I couldn’t wait to wear it!

Dogs in Plaid

I used a free scotty dog template I found on the web and a remnant of dark plaid corduroy fabric to make a doorstop.

i stuffed the legs with pinto beans for heaviness and the rest with fiberfill. Although not as sturdy as the cast iron version, it stands up and does its job. 

*********************************************************

I had fleece fabric left over from my cape that was calling out to be made into a dog coat so my dog and I can match. I looked online for a pattern before getting the idea to use an existing coat as a template. The coat was a good fit with the exception of the belly straps which were too long and positioned too far down interfering with his peeing while on walks. I made it reversible by using a small blue fleece blanket I bought at Dollar Tree for the other side. The collar and belly straps are separate pieces which are tucked inside before sewing the coat right sides together leaving an opening for turning. Sew-in velcro is used for fastening. The original coat is underneath in the comparison photo below.

I finished by topstitching with red thread and sewing a buttonhole for his harness.

This was the first time I sewed a dog coat and it was a satisfying project. Sparky is looking very dapper!

I had enough fabric left over to also make an infinity scarf for me, and a tiny cowl for Sparky.

Old Year, New Year

I started last year with the creative arts of sewing, cross stitch, and knitting, but unfortunately I had to stop knitting due to increasing carpal tunnel symptoms. In 2023 I sewed 10 tops, 2 outerwear items, and 2 non-clothing items. I also knit 2 items, cross stitched 3 small ornaments, and made Christmas ornaments.

I sewed 2 versions of the Weekend Getaway Blouse, in both knit and woven fabric.

I sewed a floral Lyric Peplum top, a pattern I’ve owned for some time, and finally used for the first time.

I sewed the Sparky top as part of a Sew Over 50 challenge to sew a pattern with the cover photo of a model over 40 years old. The model is the pattern’s creator, Heidi of the blog Designs By Heidi on WordPress. The purpose of the challenge was to increase the visibility of older sewists who have been largely ignored, although we are a sizable percentage of the sewing community.

I also sewed some basic tees/knit tops, some with fabric leftovers. The teal, floral Laundry Day Tee is the prettiest of the bunch.

I sewed a summer dress-to-top refashion.

I sewed 2 pairs of pants that I don’t wear, so I have to add some pants to my sewing list for next year.

I sewed 2 outerwear items: a light-as-air voile summer wrap and a cozy fleece cape.

m8029

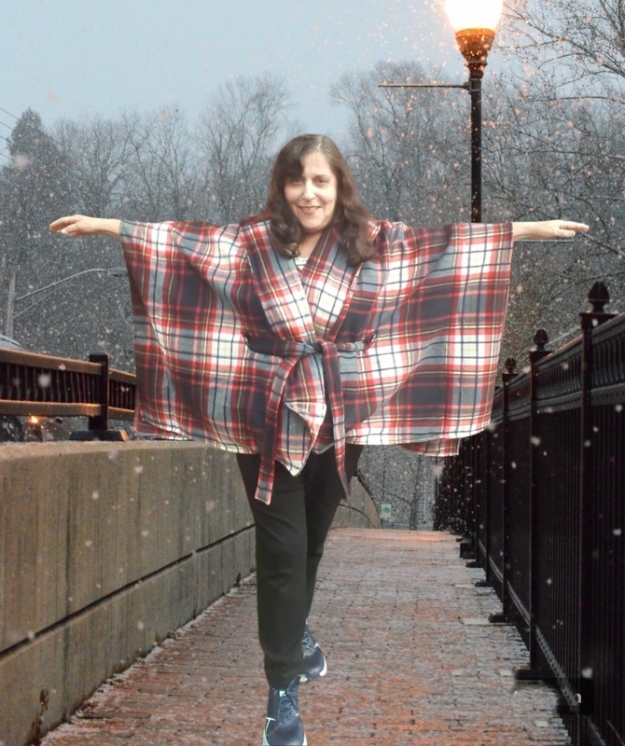
By the way, I had a lot of fun with the cape photo shoot. I wanted wintry photos to show off this garment, so I changed the background. I think the photos look quite convincing! The sunny, orange tree original is also quite nice. I can’t complain about living in a warmer climate.

My non- garment sewing was Scandinavian Christmas Dolls and a quilt which I completed in 3 sections using the quilt-as-you-go technique. I definitely plan on making another quilt this year.

My knitting:

I also experimented with dyeing fabric for the first time. I’m going to save that and the cross stitched pieces for their own posts.

*********************************************************

On to 2024:

Happy New Year!

One of the best things about blogging, is looking back to read what I wrote last year. This is what I wrote about my sewing goals:

2023: My main goal is to enjoy the creative process, as well as produce some useful or beautiful objects….my favorite projects are those that I feel inspired to make…. to branch out, and have multiple projects in different needle arts going at the same time.

I lived up to those goals, and they still apply.

I don’t have a list of sewing patterns I intend to make in 2024. Instead, I made a different list of sewing and making goals.

  1. Sew a pattern I haven’t made before.
  2. Sew another iteration of a pattern I’ve made.
  3. Sew a refashion.
  4. Sew something practical.
  5. Sew something just because.
  6. Sew a non-clothes item.
  7. Make a non-sewing project.
  8. Participate in a sewing challenge.
  9. Pick a stash fabric, pair it with a pattern, and sew.
  10. Play sewing hooky.

I just wrote it, but realized I completed this list last year. Some things fit more than one category. I sewed 3 new patterns: the Weekend Getaway Blouse, Lyric Peplum Top, McCalls 8029; the Laundry Day Tee is a repeat pattern, the Sparky top was for a sewing challenge, the quilt is a non-clothes item, the tees are practical, the dolls are “just because”, etc. The voile was the stash fabric that wasn’t bought with any pattern in mind that I found the perfect use for.

What is sewing hooky? At the start of the covid pandemic when everything was closed, and staying home was strongly encouraged, I set aside sewing time for Saturday afternoons. It turned into a habit I still enjoy. But sometimes, it’s a nice break to do something different, to get outside and enjoy a beautiful, sunny winter’s day or watch a movie in cold air-conditioning on a hot summer’s day.

McCalls 8029 – It’s a Cape

I didn’t know if I was capable of finishing this last sewing project of 2023, but managed to wrap it up! Okay – that was my attempt at being clever.

I bought 3 yards of plaid polar fleece in 2021 with the intention of making this cape, but I was also uncertain about whether I would like it. Recently, I tried on a blanket-like cape/poncho at CVS and decided to give this pattern a go.

McCalls 8029 is supposed to be an easy pattern, but I had a hard time with it. I’ve been sewing for 10 years, but I’m not a natural. I do best with detailed instructions. I was thoroughly confused and made many mistakes, but I found solutions.

This is a garment that looks dramatic in photographs, so it needed a special photo shoot.

cape
m8029
m8029
m8029
m8029

I didn’t add pockets, but discovered I could just put my arms under the cape for warmth. The cape feels warm when worn with long sleeves, but my arms were cold when wearing short sleeves.

m8029

I sewed size medium, and made the view without the hood. It helped that the pattern has been around for awhile and I found blog and Instagram posts and videos regarding the construction. The pattern instructions have the maker attach the collar and lapel piece wrongs sides together, but I elected to sew them the conventional way. Although fleece doesn’t fray, I still serged and hemmed the bottom and sides. Then I topstitched for a neat finish. There were several important steps not mentioned in the instructions. To keep the two sides of the collar together and attached at the back neck, I stitched in the ditch on the back neck, and tacked the inner facing.

m8029
m8029

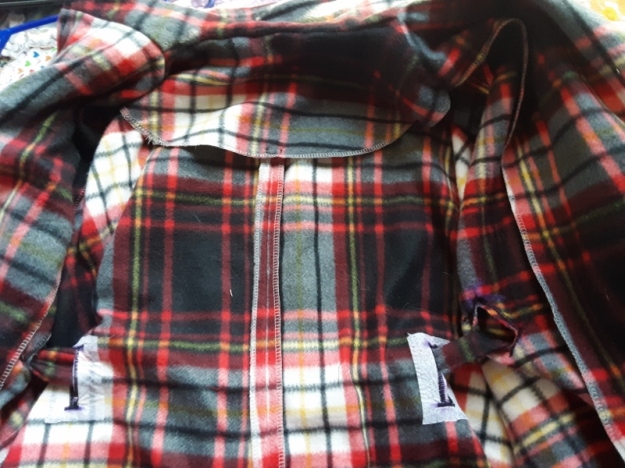
The view of the inside below shows the long buttonholes for the belt. The instructions omit interfacing the buttonholes. I didn’t think to interface the front buttonholes, and they look bad. I interfaced the back buttonholes, which helped. However, I didn’t interface the collar and the front panels that fold back as instructed in the directions, and I am happy with that decision.

m8029

Now, what will I sew in 2024?

Short Sleeve Tees

Short sleeve tees are the basis of my home wardrobe, except in summer when I wear sleeveless tops, and winter nights. I often like to make them from 100% cotton jersey and from cheap sources like Dollar Tree and garage sales that I buy in a large size and then re-cut and sew. The cotton jersey fabric that I see online has a small percentage of spandex added, which is OK sometimes, but I would love a source for 100% cotton.

I don’t like the sizing of the standard tees sold. The neck is too high and tight, the length too long, and the shoulders are big in the size I need to fit my bust. I sewed one tee with extended shoulders and the other with actual sleeves.

I also made a tee with jersey fabric left over from a previous make, a striped dress. This fabric was bought as yardage, and is a cotton/ spandex blend. I had to piece panels of fabric together. The altered direction of the stripes adds interest to this tee. The neckline was serged, turned under, and sewn.

Next, I sewed a Laundry Day Tee with a floral, rayon blend jersey fabric. To me, this is a dressier tee to wear for going out. After wearing the tee a few times, I took width out of the bottom, and re-hemmed it slightly shorter.

I only had a yard of fabric, although it was wide (58 or 60 inches) like most knit fabric. I did a very short rolled neck. The close-up shows the neckline, and the pretty teal print. I often like to do a photo shoot with my dog using fabric as the background before I cut into it.

I sewed a second “leftovers” top with the remaining piece of a two yard cut of soft hacchi sweater knit. I wanted a slouchy top with deeper extended shoulders for home wear. I pieced a bottom band and cut the front with a center seam. I had a little trouble with the v-neck band, and re-sewed it a few times, until I decided it was flawed but acceptable.

These knit tops will get a tremendous amount of wear, although they’re hardly blog-worthy enough to write about. There is no story to tell about them. I hope to finish one last project before the end of the year that is more interesting.

The photo is a clue (and another cute photo of Sparky):

Weekend Getaway Blouse 2

Although this pattern is meant for woven fabrics, I previously sewed this in a cotton jersey. I was waiting for just the right fabric to sew a woven version. The neckline and the exposed facing are the most eye catching aspects to this pattern. The facing can be made in the same fabric, but I like to use a contrasting color for interest. (I noticed some loose threads on my neckline photo close-up).

I bought one yard of a pretty plaid double-sided double gauze fabric online. There was only one yard left, or I would have bought two! This fabric is not crinkly at all, unlike the solid lilac double gauze also known as bubble gauze that I used for the facing.

I ironed the bubble gauze flat. Such a difference!

I made a size 12 in the knit fabric, so decided to size up to a 14. I used size 8 at the shoulders to lessen the length of the bodice, and the depth of the neck opening. It turned out that I didn’t need to size up, and I should have also made other changes to the shoulder area because of my smallness in my upper body.

The photograph above shows the open weave of the fabric. The fabric feels very comfortable to wear, light and airy, but there are two problems sewing with it.

It’s hard to unpick stitches. I don’t know about you, but this is something I do routinely.

It also frays easily. That wasn’t really a problem as I finished the seams with the serger. The photo below shows that I had to cut a deeper facing for the back neck to compensate for the fraying. The pattern size was unworkable as I would have to sew farther in to make it secure, which wouldn’t leave me enough to turn to the wrong side. (The narrower facing looks extra bad because the photo is after I removed it from the blouse).

The photos of sewing the facing to the neckline, and the inside of the blouse after completion.

I left out the bust dart because it wasn’t needed with the boxy sizing I chose. I like the back pleat to this pattern.

The finished blouse is pretty and unique. This was my last make of the summer. I’m working on sewing some non-pastel colors for fall and winter.